Monday, October 15, 2012

Multi-platform AudioSink


One of the major late changes in Marsyas was changing the AudioSink/AudioSource engine so that it would work with the latest versions of the MacOS (Lion and newer). The old code was moved do AudioSinkBlocking and AudioSourceBlocking.

Today I found out that the new code does not work under Linux, but the old code does. The problem is, how to build a program using AudioSink that will work in both Linux and MacOS?

My solution (under Python) was creating an if-statement that will select which AudioSink to use, as in:

import os
if os.uname()[0]=="Linux":
    # create network using AudioSinkBlocking
else:
    # create network using AudioSink

That's it for today's short snippet.
Happy multiplatform coding!

Saturday, August 18, 2012


Synthesizing trumpet tones with Marsyas using FM synthesis

We are going to emulate a trumpet tone according to the two operator method described by Dexter Morrill in the first edition of the computer music journal.

Prerequisites

To follow this tutorial you will need:
  • Python - I'm using version 2.7, but 2.6 or 2.5 should work as well
  • Marsyas - compiled with the swig python bindings
  • marsyas_util - found in src/marsyas_python/ from the Marsyas svn repository
  • plot_spectrogram - from the same location
marsyas_util.py and plot_spectrogram.py should be placed in the same folder as the code examples. marsyas_util defines some Marsyas helper functions we can use to set up MarSystems easier, and plot_spectrogram can be used to draw spectrograms of our output.
A tutorial on installing Marsyas and swig python bindings can be found here.
I'm also assuming you have some experience with classes in python, and object oriented programming in general.

Lets talk about FM synthesis

FM is short for frequency modulation. This name is great because it literally describes what is taking place, we are modulating the frequency of a signal. In other words, changing the pitch of a tone over time. If you change the pitch back and for fast enough, say at the same rate as an audio signal, it start sounding like one tone consisting of many frequencies.
The easiest and most commonly used version of FM synthesis is to have two sine wave generators. One is called the carrier; it is where we get our output from, and the other is called the modulator; it controls the frequency of the carrier.
Both are normally set to be in the audible range, but some neat aliasing effects can be achieved if they are not(this also depends on the sample rate of the system). See this.
The two most import parameters when working with FM synthesis are:
  • Modulation Index
  • Modulation Ratio
The ratio is used to calculate the frequency of our modulation oscillators:
modulation frequency = base frequency x ratio
If the ratio is a whole number our sidebands will be harmonic. Otherwise we will end up with an enharmonic spectrum.
The modulation index is used to calculate how many hz our signal should be modulated by:
modulation depth = base frequency x modulation index
The higher the index the more high frequencies will show up in our output. The actual amplitude of each sideband is scaled by a Bessel function, and the amount a sideband is scaled by will change depending on the mod index. See this for a bunch of math you don't really need to know to play with FM synthesis.
It is important to note that as our mod index gets higher then three the spectrum starts becoming harder to predict.

Trumpets

To approximate a trumpet tone we need about eight harmonics. Most of the energy is contained around the first and sixth harmonics.
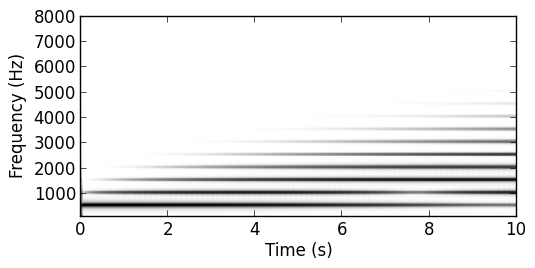
One approach to generating these harmonics would be to simply have one FM pair, and have the modulation ratio set high enough to generate eight harmonics.

Modulation ratio ramped from 0 to 8
One Oscillator
As you can see though as the modulation ratio starts getting higher energy starts getting lost from the fundamental. This doesn't exactly stick with the idea of having most of our energy in the first harmonic. Also, there is not enough energy in the sixth harmonic.
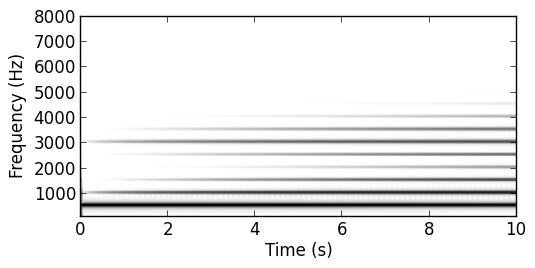
By using two of these pairs one 6 times higher, and keeping the modulation ratio of both less than three we get a much more predictable spectrum.

Osc1 ramped from 0 to 2.66 | Osc2 ramped from 0 to 1.8
Two Oscillators
This also gives us that extra energy needed around the sixth harmonic.

The structure

The first thing we will do is create a class to wrap our MarSystem. This is done so we can hide the MarSystem from the user.

#!/usr/bin/env python

# import all the functions we need from the marsyas
# library, and marsyas_util.
from marsyas import *
from marsyas_util import create

class FM:

    def __init__(self):
        """
        This method is where we will initialize our MarSystem.

        We will also make a call to _init_fm(), and _init_audio() These
        functions could be directly in __init__(), but I've separated them out
        to help better organize the code.
        """

    def __call__(self):
        """
        This method should tick out MarSystem. We override the
        __call__() method so we can use the syntax:

            fm_instance()

        To tick the MarSystem.
        """

    def _init_fm(self):
        """
        This method will re-map our MarSystems controls to something that is
        easier to call.
        """

    def _init_audio(self):
        """
        This method will set up the audio system, currently we are only using
        the marsyas AudioFileSink. If you wanted to use the AudioSink MarSystem
        that should be initialized here as well.
        """

    def set_ratios(self):
        """
        This method should be used to set the default modulation ratios for the
        MarSystem.
        """

    def set_mod_indices(self):
        """
        This method should be used to set the default modulation indices for
        the MarSystem.
        """

    def update_oscs(self):
        """
        This method is used to set the frequency of the MarSystem oscillators.
        It will use the default ratios, and default mod indices for its
        calculations
        """

    def update_envs(self):
        """
        This method will set the default amplitude envelope for the MarSystem.
        """
        
    def note_on(self):
        """
        This method will set the note_on message for the MarSystem.
        """
        
    def note_off(self):
        """
        Likewise this method will set the note_off message for the MarSystem.
        """

    def relative_gain(self):
        """
        This method with be used to set the gain ratio between the two
        oscillators.
        """

Setting up the system

The first order of business in our class is to set up our constructor. In python this is the init method. Our method should look like:

def __init__(self):

    """
    The following four lines in more graphical terms:

        osc1 = FM => ADSR => Gain
        osc2 = FM => ADSR => Gain

        fms = | osc1 =>
              | osc2 =>

        gen = | osc1 
              |    \\
              |     (+) => SoundFileSink
              |    //
              | osc2
    """
    osc1 = ["Series/osc1", ["FM/fm1", "ADSR/env1", "Gain/gain1"]]
    osc2 = ["Series/osc2", ["FM/fm2", "ADSR/env2", "Gain/gain2"]]
    fms = ["Fanout/mix", [osc1, osc2]]
    gen = ["Series/fmnet", [fms, "Sum/sum", "SoundFileSink/dest2"]]

    """
    create is a function defined in marsyas_util, it takes
    in a list of lists, and parses it to create our MarSystem.
    """
    self.network = create(gen)

    """
    These methods will be discussed next, the one thing I would like to discuss
    here is the leading _ on the method name. This indicates that these methods
    are 'private', and should not be called from out side this class.
    """
    self._init_fm()
    self._init_audio()

    """
    Here we set up the member variable tstep, this is used to get how much time
    has passed each time we tick the marsystem.
    """
    bufferSize = self.network.getControl("mrs_natural/inSamples").to_natural()
    srate = self.network.getControl("mrs_real/osrate").to_real()
    self.tstep = bufferSize * 1.0 / srate

Mapping the controls

The following method maps our controls so that we can access them using:

network.updControl("mrs_real/Osc1cFreq")
instead of:

network.updControl("Fanout/mix/Series/osc1/FM/fm1/mrs_real/cFrequency")
Because we may want to re-use this system in a larger contexts linking controls like this becomes really import; it keeps access to system parameters from becoming completely ridiculous.
All of these parameters that are getting linked now will be discussed in later sections.
The one parameter I would like to talk about now is the "mrs_real/noteon". Both envelopes have been linked to the same control so both can be triggered at the same time. The same thing happens with the oscillators "mrs_bool/noteon".

def _init_fm(self):
    # Map Osc1 Controls
    Osc1 = 'Fanout/mix/Series/osc1/FM/fm1/'
    self.network.linkControl(Osc1 + "mrs_real/cFrequency", "mrs_real/Osc1cFreq")
    self.network.linkControl(Osc1 + "mrs_real/mDepth", "mrs_real/Osc1mDepth")
    self.network.linkControl(Osc1 + "mrs_real/mSpeed", "mrs_real/Osc1mSpeed")
    self.network.linkControl(Osc1 + "mrs_bool/noteon", "mrs_bool/noteon")
    # Map Osc2 Controls
    Osc2 = 'Fanout/mix/Series/osc2/FM/fm2/'
    self.network.linkControl(Osc2 + "mrs_real/cFrequency", "mrs_real/Osc2cFreq")
    self.network.linkControl(Osc2 + "mrs_real/mDepth", "mrs_real/Osc2mDepth")
    self.network.linkControl(Osc2 + "mrs_real/mSpeed", "mrs_real/Osc2mSpeed")
    self.network.linkControl(Osc2 + "mrs_bool/noteon", "mrs_bool/noteon")
    # Map ADSR1
    adsr1 = 'Fanout/mix/Series/osc1/ADSR/env1/'
    self.network.linkControl(adsr1 + "mrs_real/nton", "mrs_real/noteon")
    self.network.linkControl(adsr1 + "mrs_real/ntoff", "mrs_real/noteoff")
    self.network.linkControl(adsr1 + "mrs_real/aTime", "mrs_real/attack1")
    self.network.linkControl(adsr1 + "mrs_real/dTime", "mrs_real/decay1")
    self.network.linkControl(adsr1 + "mrs_real/rTime", "mrs_real/release1")
    # Map ADSR2
    adsr2 = 'Fanout/mix/Series/osc2/ADSR/env2/'
    self.network.linkControl(adsr2 + "mrs_real/nton", "mrs_real/noteon")
    self.network.linkControl(adsr2 + "mrs_real/ntoff", "mrs_real/noteoff")
    self.network.linkControl(adsr2 + "mrs_real/aTime", "mrs_real/attack2")
    self.network.linkControl(adsr2 + "mrs_real/dTime", "mrs_real/decay2")
    self.network.linkControl(adsr2 + "mrs_real/rTime", "mrs_real/release2")
    # Turn Oscillators on
    self.network.updControl( "mrs_bool/noteon", MarControlPtr.from_bool(True))
 
The oscillators are also turned on at this point because we want them to generate a constant signal. We will instead use the ADSR envelopes to control the output volume of the system.

Initializing the audio

Here we are setting up the audio output for our MarSystem. Right now we are just using the file output, but buffer_size and device are left in the method call in case we want to add the ability to directly write to an AudioSink.

def _init_audio(self, sample_rate = 44100.0, buffer_size = 128, device = 1):
    """
    Sets up the audio output for the network
    """
    self.network.updControl( "mrs_real/israte", sample_rate)
    # Set up Audio File
    self.network.updControl( "SoundFileSink/dest2/mrs_string/filename", "fm.wav")

Overriding defaults and ticking the network

The call method is python is used to make an object callable. Here we want to use call to tick our network. This means we can call and instance of our FM class like:

fm_instance() 
Instead of:

fm_instance.tick() 
Each call to our class will now cause audio to processed:

def __call__(self):
    self.network.tick()
We will also set up two more methods to override the default values for our mod ratio and mod indices.


Mapping the FM controls Because we already mapped these controls earlier on it is now just a matter of making a method call that can set these parameters.

def update_oscs(self, fr1, fr2):

    # Set Osc1
    self.network.updControl("mrs_real/Osc1cFreq",  float(fr1))
    self.network.updControl("mrs_real/Osc1mDepth", float(fr1 * self.in1))
    self.network.updControl("mrs_real/Osc1mSpeed", float(fr1 * self.ra1))

    # Set Osc2
    self.network.updControl("mrs_real/Osc2cFreq",  float(fr2))
    self.network.updControl("mrs_real/Osc2mDepth", float(fr2 * self.in2))
    self.network.updControl("mrs_real/Osc2mSpeed", float(fr2 * self.ra2))

The envelopes

Here we will be doing very much the same thing as we just did above, but this time we will be setting the parameters for our amplitude envelopes.
An ADSR envelope like the one we are using in this system has four stages:
  • Attack - time to get to the maximum amplitude
  • Decay - time to get to the sustain amplitude
  • Sustain - holds the sustain amplitude until given note off
  • Release - time for the amplitude to reach zero after the note off
def update_envs(self, at1, at2, de1, de2, re1, re2):

    # Envelope one settings
    self.network.updControl("mrs_real/attack1",   at1)
    self.network.updControl("mrs_real/decay1",    de1)
    self.network.updControl("mrs_real/release1",  re1)

    # Envelope two settings
    self.network.updControl("mrs_real/attack2",   at2)
    self.network.updControl("mrs_real/decay2",    de2)
    self.network.updControl("mrs_real/release2",  re2)

Note on, note off

These two methods are used to tell our envelope when to turn on, and when to turn off. We mapped the controls we are using now back in the mapping controls section.

def note_on(self):
    self.network.updControl("mrs_real//noteon",  1.0)

def note_off(self):
    self.network.updControl("mrs_real/noteoff", 1.0)

More envelopes

The last ability we need to create a "Convincing" FM trumpet is the power to modulate the index over time.
I have written an ADSR envelope in python that will allow us to modulate any parameter of our synth. We can only update the value each time we tick our system, but it is better then having no modulation.
This envelope can be used like:
modenv = ADSR(synth, "mrs_type/parameter")
Each time modenv() is called it will tick the envelope, and update the parameter.
It also has the ability to scale the output, or change the times for the attack, decay, and release.
modenv = ADSR(synth, "mrs_type/parameter", dtime=something, scale=something)

Lets put this all together

The first thing we need to do is set up an instance of our synth.
synth = FM()
And then override the envelope. For this to sound trumpet like we need a fast attack/decay/release. The decay time for the higher oscillator should be slightly longer.
synth.update_envs(at1=0.03, at2=0.03, de1=0.15, de2=0.3, re1=0.1, re2=0.1)
Then we set the ratios. For our trumpet tone we need the first oscillator to be 1 to 1, and the second to have the modulator 6 times lower.
synth.set_ratios(1, 1.0/6)
The last thing we need to do to initialize the synth is set the relative volume of each oscillator. The second oscillator should quieter than the first.

synth.set_gain(1.0, 0.2)
It would be cool if we could play a little melody, so lets create a list of notes to play.

pitch = 250
notes = [pitch, pitch * 2, (pitch * 3)/2.0, (pitch * 5)/3.0, pitch] 
We can now iterate through that list, and generate a 0.3s note for each note in
the list.

for note in notes:
    time = 0.0
    nton = 'on'

    synth.update_oscs(note, note * 6)
    modenv1 = ADSR(synth, "mrs_real/Osc1mDepth", dtime=0.15, scale=note * 2.66)
    modenv2 = ADSR(synth, "mrs_real/Osc2mDepth", dtime=0.3,  scale=note * 1.8)
    synth.note_on()
    modenv1.note_on()
    modenv2.note_on()
    while time < 0.4:
        synth()
        modenv1()
        modenv2()

        if time > 0.3 and nton == 'on':
            synth.note_off()
            modenv1.note_off()
            modenv2.note_off()
            nton = 'off'
        time = time + synth.tstep 
The first thing we do is update the frequencies of the oscillators based on our list of notes. Note that the second oscillator is six times higher than the first.
synth.set_gain(1.0, 0.2) 
The other thing you might have noticed is that we never set the default modulation index. This is because we are controlling that parameter via an envelope. Therefore we have to set the modulation amout using the ADSR scale factor.

modenv1 = ADSR(synth, "mrs_real/Osc1mDepth", dtime=0.15, scale=fr1 * 2.66)
modenv2 = ADSR(synth, "mrs_real/Osc2mDepth", dtime=0.3,  scale=fr2 * 1.8)
 
Finaly we can run the program with python main.py, it should give us this as an output.

Limitations and improvements

A system could be set up such that the control values of the system are used to map an input channel of the MarSystem to various parameters, such as the modulation index, pitch, ratio, and any other interesting parameters. This would allow for sample accurate modulation.
There are also some other issues with the built in FM module. If the mod ratio isn't a whole number, or the modulation index is too high, there will be pops and clicks in the output signal. This could be a side effect of the FM module having a fairly small non-interpolating wavetable.

Wednesday, February 22, 2012

Real-time spectrogram (and other audio-related data) visualization using Marsyas and OpenCV

Visualizing the output of Marsyas networks can be a tricky thing, because data is streamed in real time. I have found that a fast way to do that is by using python's OpenCV bindings, so that we can view, for example, a spectrogram being streamed in real time. For this to work, you will basically need to get data from a mrs_realvec to a numpy array. To do that, after you have created the network you will use:
 
net.tick()
out = net.getControl("mrs_realvec/processedData").to_realvec()
out = numpy.array(out)

That means that you will need to have: import numpy to get that functionality. You will have to pre-define a 2-dimensional numpy array that will store past values of your spectrogram. In our solution, we want the spectrogram to flow from right to left, hence we will need a 2-dimensional array where the columns represent time and the lines represent frequencies. The array may be initializes as:
 
Int_Buff = numpy.zeros([DFT_size, nTime])

where DFT_size is the size of your DFT and nTime is the number of time sample you want to store. After getting the out array, you should remove the first column of Int_Buff and append the new data to the last position. Before doing so, it is necessary to add a dimension to out and transposing it (this is due to the way numpy is implemented - one-dimensional arrays cannot be appended to two-dimensional array, and the conversion assumes the output is a line array, which is not what we want at this point). So, we will have:
 
if numpy.ndim(out)==1:     # If out is a 1-dimensional array,
 out = numpy.array([out]) # convert it to 2-dimensional array
Int_Buff = Int_Buff[:,1:] # Remove first column of Int_Buff
Int_Buff = numpy.hstack([Int_Buff,numpy.transpose(out)]) # Transpose / horizontal stack 

From that, you may yse the function array2cv(), defined in http://opencv.willowgarage.com/wiki/PythonInterface, to convert from a numpy array to cv's image format. Of course, to deal with that you will need to have:
 
import cv
im=array2cv(Int_Buff)

Remember that before dealing with images you will need to create a window where things will be displayed. For that, use:
 
cv.NamedWindow("Marsyas Spectral Analysis", cv.CV_WINDOW_AUTOSIZE)

So, the following lines tell OpenCV to show your data:
 
cv.ShowImage("Marsyas Spectral Analysis", im)
cv.WaitKey(10)

If you only do the steps above, you will probably get a black screen. You will want to normalize your output array before stacking it to your memory, using:
 
out = out/numpy.max(out)

Also, you may notice that, so far, the bass frequencies are on top while the trebles are on the bottom of the screen. That is the reverse of what we usually want. We will need to reverse the order of the output array, using:
 
out = out [::-1]

All of these ideas are coded in the spectral_analysis.py utility, already in the Marsyas repository. The actual implementation adds some other utilities, for example, the possibility of trimming the spectrogram so that only a certain frequency range is shown. The current program is an example implementation, and may be expanded for other uses, if necessary. If you just want to see how your voice's spectrogram looks like, try it:
 
python spectral_analysis.py